
Plan where every device will go and check your kit before deploying. A well-planned deployment means installing devices is quick and easy, and the initial software setup afterwards will be easy too.
Map out ideal monitoring locations
If you have a management plan stating monitoring locations, sources and receivers, you may be able to skip ahead to determining your actual monitoring locations and deployment methods.
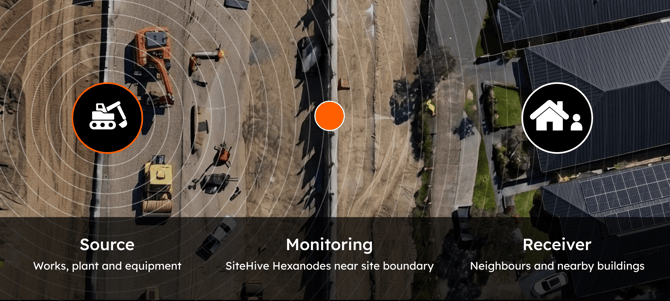
Map out the site sources (e.g. activities, plant and equipment) that will emit to site receivers (e.g. nearby residents, neighbouring sites). It is also important to note where external sources may be, such as neighbouring sites and roads. Where possible, it is invaluable to monitor both internal and external sources, so you can distinguish your site's impact from everything else.
With sources and receivers identified, you can map out ideal monitoring locations. Ideally, monitor at both the receiver and at the site boundaries closest to sources. Where that is not feasible, monitoring at site boundaries that sit between major sources and receivers is the next best thing.
Practical considerations for choosing actual monitoring locations
Once ideal monitoring locations are identified, you can factor in practical considerations to determine your actual monitoring locations and deployment methods. The major considerations are: measurement accuracy, power, connectivity, security, and access and approvals.
Measurement accuracy
A few rules of thumb by aspect:
|
Noise |
Ideally a clear line to the works and to the receiver you are protecting. Away from walls and large reflective surfaces where possible. |
|
Dust |
In the open air between the works and the receiver. Where possible, avoid hyper-local sources such as vehicle exhaust, water and vegetation. |
|
Vibration |
As close to the receiver as possible, ideally mounted on a solid structure or firm ground. |
|
Weather |
Open exposure, clear of buildings, trees and hoardings that shield wind and rain. |
Power decisions
SiteHive Hexanode devices can be powered easily and flexibly. They require only 12 V and a low power draw, and the cabling is easily extended, so they can be deployed anywhere.
Main power options, by ease:
-
Mains power, such as a GPO or a generator.
-
Solar with a battery. 10 W to 20 W panels require ample sunlight: face the panels north and keep them out of shade.
-
Battery only.
There are two main battery options, and which one suits depends on how you are mounting:
-
Lithium battery: small and light (1.5 kg). Excellent for mobility and for mounting above ground, on fences, poles and hoarding.
-
Lead-acid battery: robust and heavy. Excellent for durable deployments on the ground.
The full comparison, including daily consumption per device, is in Power and battery options.
Connectivity
The device connects over 4G on its own; there is nothing to configure on site. Check you have phone signal at each planned location. If your phone has signal, the device will too. Avoid tucking a device deep inside concrete or metal structures.
If connectivity is difficult on your site, the devices are also capable of Wi-Fi, for example via Starlink, a 5G modem or an existing network. Heavy-duty antenna options are available for rural and remote sites.
Security
Tampering and theft are rarely an issue. If security is a concern on your site, mount devices, batteries and panels higher up, on poles or walls, to discourage unwanted attention.
Access and approvals
-
Permission to mount on fences, poles, walls or neighbouring property.
-
Permission to mount in soil, if you are using star pickets or spikes for a Vibration device.
-
Access to mains power, if you are using it, and who can isolate it.
-
Who unlocks the gate on install day, and whether the spot will still be reachable once the works progress.
Decide your final monitoring locations
Balancing these considerations tells you exactly where to locate your monitors, and how you will power and mount them. A pre-deployment site walk is a great way to make sure the setup is both optimal and easy.
Before deployment, prepare a marked-up plan of your final monitoring names and locations, mounting methods and key considerations. Naming your Monitoring Points now is what makes the software pass quick: see What is a Monitoring Point?.
See how other sites have done it in the Deployment gallery.
Check the kit
Lay everything out and check before you leave.
-
SiteHive Hexanode devices
-
SiteHive power and mounting accessories: solar panels, stands, brackets, screws, and batteries
-
Your monitoring locations and names
-
Tools and deployment kit:
-
A phone, with a compass and a camera
-
Screwdrivers, Allen keys and zip ties
-
A power drill and screws, if you are mounting to hoarding
-
Cloth tape and glue for vibration mounting to hard, flat surfaces
-
💡 Anything missing or damaged? Contact your Regional Success Manager or email support@sitehive.com.